Accessing wifi in Arduino
open the serial monitor and enter the code given down below.
Code:
| #include <ESP8266WiFi.h> | |
| const char* ssid = "aneesh"; | |
| const char* password = "raspberry"; | |
| const char* host = "www.google.com"; | |
| void setup() { | |
| Serial.begin(115200); | |
| delay(100); | |
| // We start by connecting to a WiFi network | |
| Serial.println(); | |
| Serial.println(); | |
| Serial.print("Connecting to "); | |
| Serial.println(ssid); | |
| WiFi.begin(ssid, password); | |
| while (WiFi.status() != WL_CONNECTED) { | |
| delay(500); | |
| Serial.print("."); | |
| } | |
| Serial.println(""); | |
| Serial.println("WiFi connected"); | |
| Serial.println("IP address: "); | |
| Serial.println(WiFi.localIP()); | |
| } | |
| int value = 0; | |
| void loop() { | |
| } |
Arduino on PI
- The first step is to load the Arduino environment to PI, by using the following commands
sudo apt–get update
sudo apt–get dist–upgrade
- Next, Install Arduino IDE with,
sudo apt–get install Arduino (Click Y to add any dependencies)
- To disable the serial login (for Raspberry- Pi 3),
sudo systemctl stop serial–getty@ttyS0.service
sudo systemctl disable serial–getty@ttyS0.service
- The next step is to disable the boot info, for this we need to edit the /boot/cmdline.txt file by deleting the “console=serail0,115200″ as shown.
dwc_otg.lpm_enable=0 console=tty1 root=/dev/mmcblk0p6 rootfstype=ext4 elevator=deadline rootwait
To link the serial port to the Arduino IDE, we create a permanent link that maps AMA0 to S0.
- Now create a file by “ sudo nano"
Enter the following code in the newly created file
KERNEL==“ttyAMA0”, SYMLINK+=“ttyS0”,GROUP=“dialout”,MODE:=0666
KERNEL==“ttyACM0”, SYMLINK+=“ttyS1”,GROUP=“dialout”,MODE:=0666
and save it to: /etc/udev/rules.d/
And then to link the new avrdude-autoreset to avrdude so that the new version runs instead.
sudo ln –s /usr/bin/avrdude–autoreset /usr/bin/avrdude- Adding the sleepy Pi to the Arduino environment, to run the Arduino environment we need to create the sketchbook folder and then “hardware” & “Sleepy_pi ” in sketchbook.
mkdir /home/pi/sketchbook
mkdir /home/pi/sketchbook/hardware
mkdir /home/pi/sketchbook/hardware/Sleepy_pi
- Now create another file “boards.txt” in Sleepy_pi folder and the file contains the following code,
sleepypi.upload.protocol=arduino
sleepypi.upload.maximum_size=30720
sleepypi.upload.speed=57600
sleepypi.bootloader.low_fuses=0xFF
sleepypi.bootloader.high_fuses=0xDA
sleepypi.bootloader.extended_fuses=0x05
sleepypi.bootloader.path=arduino:atmega
sleepypi.bootloader.file=ATmegaBOOT_168_atmega328_pro_8MHz.hex
sleepypi.bootloader.unlock_bits=0x3F
sleepypi.bootloader.lock_bits=0x0F
sleepypi.build.mcu=atmega328p
sleepypi.build.f_cpu=8000000L
sleepypi.build.core=arduino:arduino
sleepypi.build.variant=arduino:standard
8. As a final step, Reboot the Pi to complete and load all changes.
HTTP Server on PI
HTTP Webserver on Pi to host a full website or to display some information to other machines on our network. There are various web server that are available with different advantages and usage. Among them, I choose Apache, which is a popular web server application and install it on Pi.
- Install Apache2 package by ” sudo apt–get install apache2 –y”
- To Test the webserver,
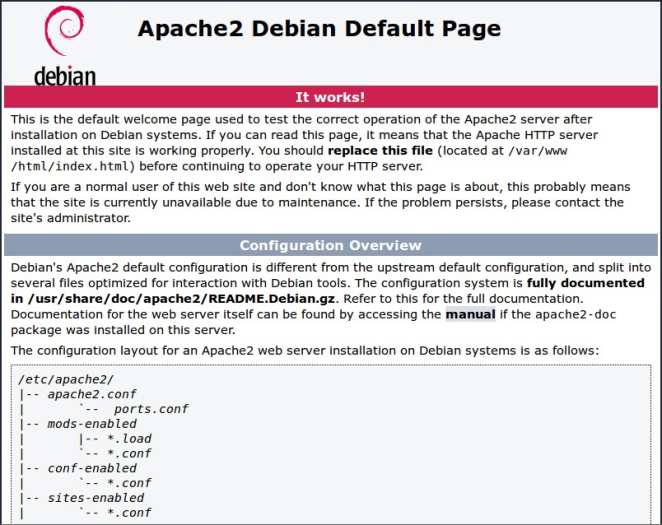
- We have a test HTML file in Apache folder, so when we type our Pi’s IP address (like http://198.162.10.22) we will get a default web page as shown in the following figure.
References:
- http://spellfoundry.com/sleepy-pi/setting-arduino-ide-raspbian/
- https://www.raspberrypi.org/documentation/remote-access/web-server/apache.md

No comments:
Post a Comment