Arduino:
Arduino is an open source, computer hardware and software company, project, and user community that designs and manufactures microcontroller kits for building digital devices and interactive objects that can sense and control objects in the physical world. The project's products are distributed as open-source hardware and software, which are licensed under the GNU Lesser General Public License (LGPL) or the GNU General Public License (GPL), permitting the manufacture of Arduino boards and software distribution by anyone. Arduino boards are available commercially in preassembled form.
Installing Arduino Software (IDE) on Windows 10 :
I followed this video to install Arduino 1.8.1 and set up with windows installer from in my Windows 10 from " https://www.arduino.cc/en/main/software ".
Post installation Arduino 1.8.1, ESP8266 package needs to be added form " http://arduino.esp8266.com/stable/package_esp8266com_index.json " in the Additional Board Manager URLs text field and Port needs to be changed to15200 and CPU frequency to 80MHz.
I installed CH340G driver which was labelled on NODEMCU and followed the steps from " https://learn.adafruit.com/adafruit-arduino-ide-setup/windows-setup "
EXPERIMENTS:
I. Blinking Experiment:
Blinking the light on the NODEMCU.
Software and Hardware Requirements:
- NODEMCU
- Breadboard
- Arduino IDE
- Connect the NODEMCU to a computer.
- run the sample program https://github.com/aneeshk263/internet-of-things/blob/master/Blink%20the%20light%20on%20the%20NODEMCU
- Light blinks on the NODEMCU.
Here is the Video of the output
II. LED blink on a different GPIO
Blinking a External LED Light bulb using NODEMCU.
Software and Hardware Requirements:
- Arduino 1.8.1.
- NODEMCU.
- LED Light Bulb.
- 200 Ohms resistor.
- Connecting wires.
- Breadboard.
Here is the video output of the experiment :
III. Reading the DHT11 and writing back to the serial port
Read and display the temperature and Humidity in celsius on the serial monitor.
Software and Hardware Requirements:
- DHT11 sensor
- Connecting wires
- Arduino IDE
- NODEMCU
- Breadboard
- 10K Ohms resistor
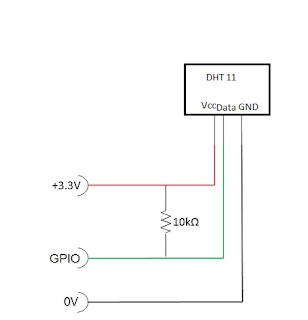
connections for the experiment:
- Connect a 10K Ohms resistor between VCC and DATA.
- Connect the GND of the DHT11 sensor to GND of the NODEMCU.
- Connect the DATA to the D3 (pin 0).
- Connect the VCC to 3V.
Here is the video of output :
IV. Reading and Displaying Temperature from DHT11 and Displaying it on 5 LED scale.
Reading Temperature from DHT11 and Displaying it on 5 LED scale.
Requirements:
- 5 LED’s
- DHT11 sensor
- Jumper wires
- Arduino IDE
- NODEMCU
- Breadboard
- 10K Ohms resistor
- 1k Ohms resistor
Procedure:
Connect the positive end of 5 LED bulb of different colors and Set a Scale for each LED bulb and connect one end of 1k Ohms resistor to the GND and the other end to negative end of 5 LED bulbs.
Here is the link to the code - https://github.com/aneeshk263/internet-of-things/blob/master/Read%20from%20the%20DHT11%20and%20create%20a%205%20led%20scale%20to%20display%20the%20temperature%20in%20celsius.


